instruction manual for old singer sewing machine
Instruction Manual for Old Singer Sewing Machines: A Comprehensive Guide
Welcome! This comprehensive guide assists in operating and maintaining vintage Singer sewing machines. Explore threading, troubleshooting, and essential parts – from bobbins to stitch mechanisms.
Discover resources for manuals and replacement parts, ensuring your machine’s longevity and sewing success!
Singer offers tools for every skill level, from beginner to professional.
Welcome to the world of vintage Singer sewing machines! These machines, crafted with enduring quality and remarkable ingenuity, represent a rich history of textile artistry. Owning a classic Singer isn’t just about having a functional sewing tool; it’s about connecting with a legacy of craftsmanship and embracing a piece of history.
This guide is dedicated to helping you understand, operate, and maintain these remarkable machines. Whether you’ve inherited a family heirloom or discovered a treasure at an antique market, this manual will provide the knowledge needed to unlock its full potential. From identifying your specific model to mastering essential sewing techniques, we’ll cover everything you need to know.
Singer sewing machines, ranging from antique models to heavy-duty modern options, offer a unique blend of durability and functionality. Understanding the intricacies of these machines, including their bobbin systems and stitch mechanisms, is key to achieving consistent and beautiful results. This manual will serve as your partner in success, ensuring your Singer continues to create for generations to come. Explore the world of Singer, where tradition meets innovation!
Discover the value of your sewing machine and the steps involved in determining it.
II. Identifying Your Singer Model
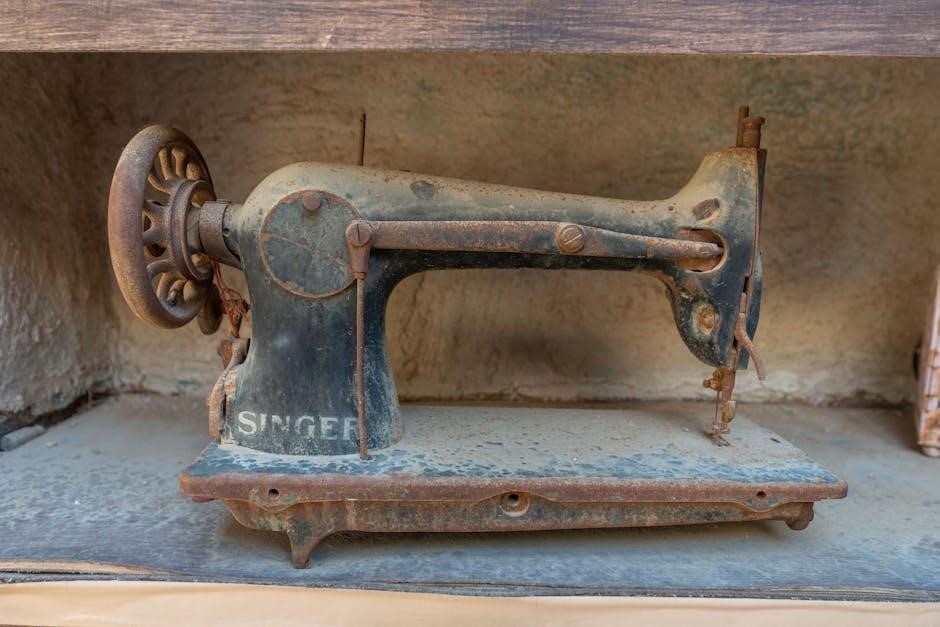
The first step in restoring or maintaining your vintage Singer is accurate identification. Singer produced a vast array of models over the years, each with unique characteristics and requirements. Knowing your specific model number is crucial for finding the correct parts, manuals, and troubleshooting information.
Begin by locating the model number and serial number. These are typically found on a plate affixed to the machine. Common locations include the front, back, or underside of the sewing head. The model number will often be a combination of letters and numbers (e.g., 15-91, 201-2). The serial number is a longer string of numbers and provides insight into the machine’s manufacturing date.
Once you have the model number, utilize online resources like Singer’s official website or dedicated vintage Singer forums. These platforms often have databases and communities where you can cross-reference your number and learn more about your machine’s history and specifications. Accurate identification unlocks a wealth of information, ensuring you can properly care for and enjoy your vintage Singer for years to come. Remember, knowing your model is the foundation for successful restoration and operation!
Singer offers tools for every skill level, from beginner to professional.
III. Dating Your Singer Sewing Machine
Determining the age of your vintage Singer adds to its story and can aid in understanding its features. The serial number is the key to unlocking your machine’s manufacturing date. While Singer didn’t maintain a perfectly consistent numbering system, general ranges correlate to specific years.
Several online resources provide serial number to date charts. These charts, compiled by Singer enthusiasts, offer a reasonably accurate estimate of when your machine left the factory. Be aware that variations can occur, and these charts are not always definitive. Factors like production runs and model changes can influence the accuracy.
Once you’ve identified the approximate year, consider the machine’s features. Early models often have different mechanisms and designs compared to later ones. Researching the specific features of your model year can confirm the dating estimate. Knowing the age helps understand the technology and materials used, informing your maintenance and restoration approach. It also adds a layer of appreciation for the craftsmanship of these enduring machines!
Singer offers tools for every skill level, from beginner to professional.
IV. Essential Parts of a Vintage Singer
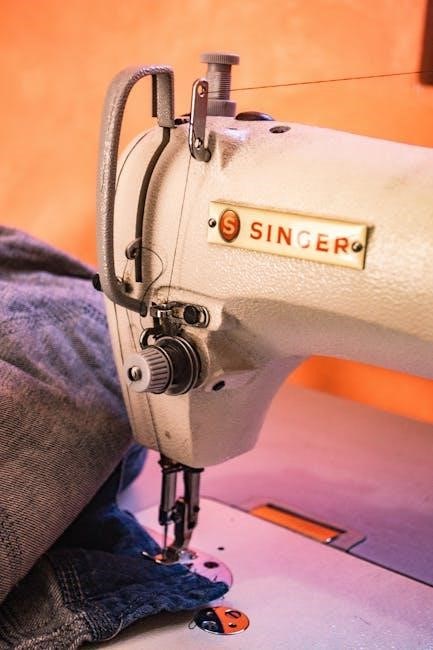
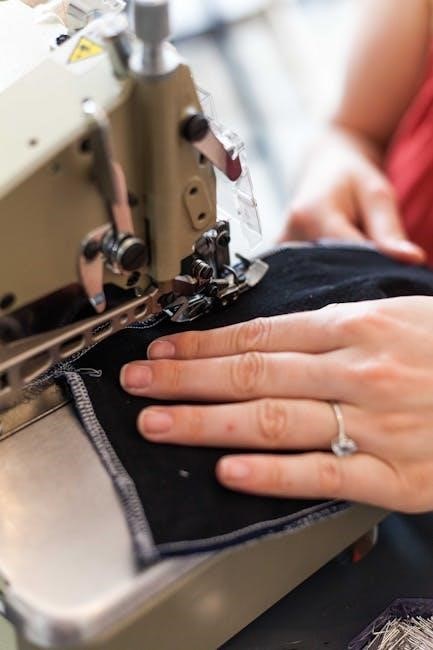
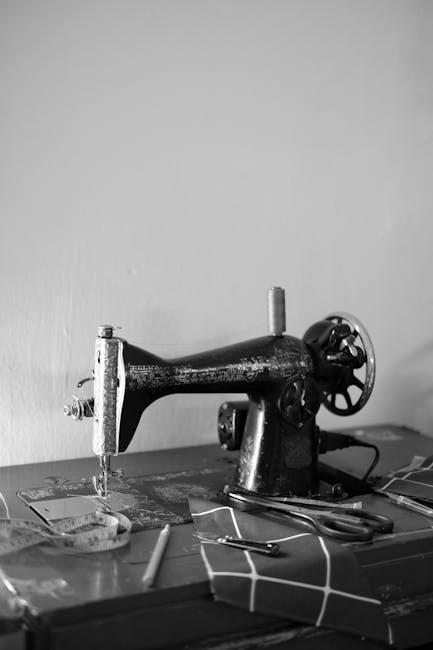
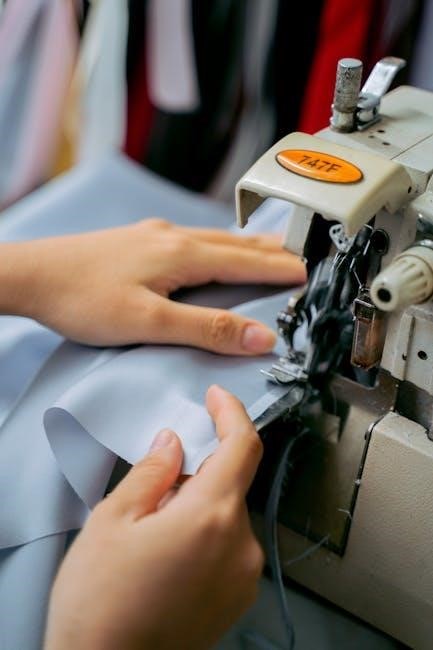
Understanding the core components of your vintage Singer is crucial for maintenance and repair. The handwheel controls the machine’s speed, while the flywheel provides momentum. The spool pin holds the thread spool, and the bobbin winder prepares the bobbin for lower threading.
The needle bar moves the needle up and down, guided by the presser foot which secures fabric. Feed dogs advance the fabric under the needle, working in conjunction with the throat plate. These parts work in harmony to create a stitch.
Vintage Singers utilize different bobbin systems – Class 15 and long bobbin systems being common. The stitch mechanism dictates stitch type and length. Familiarizing yourself with each part’s function allows for effective troubleshooting and ensures smooth operation. Regular cleaning and oiling, using recommended lubricants, are vital for preserving these components. Knowing your machine’s anatomy empowers you to keep it running beautifully for years to come!
Singer offers tools for every skill level, from beginner to professional.
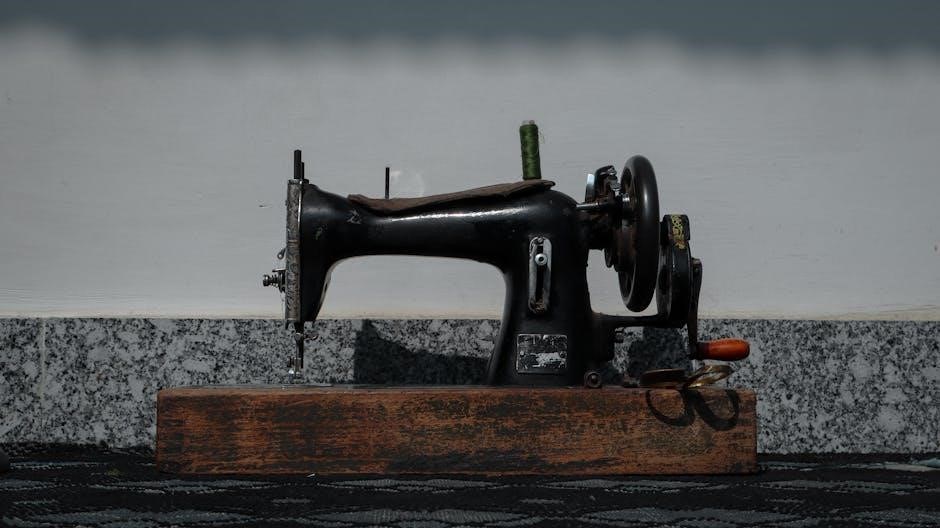
V. The Handwheel and Flywheel
The handwheel and flywheel are fundamental to a Singer’s operation, working in tandem to provide power and control. The handwheel, typically located on the right side of the machine, is your primary means of manually controlling stitch speed. Turning it clockwise advances the needle, while counterclockwise reverses it.
The flywheel, a larger weighted wheel connected to the handwheel, stores energy and maintains momentum. This ensures a smooth, consistent sewing motion, even with slower handwheel turns. Its weight is crucial for overcoming resistance from thicker fabrics.
Always turn the handwheel towards you to avoid injury. Never force the wheel if it feels stuck – investigate the cause before applying more pressure. Regular cleaning and a light oiling of the flywheel’s bearing points contribute to smooth operation. Understanding their interplay is key to mastering your vintage Singer and achieving consistent, high-quality stitches.
Singer offers tools for every skill level, from beginner to professional.
VI. The Spool Pin and Bobbin Winder
The spool pin and bobbin winder are essential for preparing your thread and ensuring a consistent supply for sewing. The spool pin, usually a metal rod on top of the machine, securely holds the spool of thread. Different Singer models may have variations – some with caps to secure the spool, others relying on friction.
The bobbin winder is used to fill empty bobbins with thread from the spool. Typically, it involves placing the bobbin on a winder shaft, engaging a lever, and using the handwheel to wind the thread evenly. Proper tension is crucial during winding to prevent uneven stitches.
Ensure the bobbin is wound firmly but not too tightly, as this can cause issues during sewing. Refer to your machine’s specific manual for detailed bobbin winding instructions. Regularly check the bobbin winder for wear and tear, and clean it to maintain optimal performance. A smoothly functioning bobbin winder is vital for uninterrupted sewing.
Singer offers tools for every skill level, from beginner to professional.
VII. Understanding the Stitch Mechanism
The stitch mechanism is the heart of your vintage Singer, converting rotary motion into the up-and-down movement that creates stitches. It’s a complex interplay of parts working in harmony. Understanding this system is key to troubleshooting and maintaining your machine.
The core components include the needle bar, which drives the needle, and the feed dogs, which advance the fabric. As the handwheel turns, a cam on the side shaft pushes the needle up and down. Simultaneously, the feed dogs move in a coordinated motion, pulling the fabric forward after each stitch.
The timing of these movements is critical. Incorrect timing can lead to skipped stitches, uneven tension, or even damage to the machine. The throat plate guides the fabric and provides a smooth surface for stitching. Regular cleaning and oiling of these components are essential for smooth operation.
Singer offers tools for every skill level, from beginner to professional.
VIII. The Needle Bar and Presser Foot
The needle bar is a crucial component, responsible for the precise up-and-down motion of the needle. It’s driven by the machine’s cam system and must be straight and free of bends to ensure accurate stitch formation. Inspect it regularly for any signs of damage.
Attached to the needle bar is the presser foot, which holds the fabric firmly against the feed dogs. Different presser feet are available for various sewing tasks – straight stitching, zigzagging, buttonholes, and more. Ensuring the correct presser foot is installed is vital for achieving desired results.
Adjusting the presser foot pressure is also important. Too much pressure can distort delicate fabrics, while too little can cause the fabric to slip. The tension screw controls this pressure. Proper alignment and secure attachment of both the needle bar and presser foot are essential for consistent, high-quality stitching.
Singer offers tools for every skill level, from beginner to professional.
IX. The Feed Dogs and Throat Plate
The feed dogs are the toothed metal pieces beneath the presser foot, responsible for moving the fabric forward during sewing. Their consistent and reliable action is fundamental to creating even stitches. Regularly cleaning lint and debris from the feed dogs is crucial for smooth fabric movement.
The throat plate, also known as the needle plate, sits above the feed dogs and supports the fabric as it’s being sewn. It features a hole through which the needle passes and markings to guide your stitching. Different throat plates are available with varying hole sizes and markings for specialized tasks.
Proper alignment of the needle with the throat plate’s hole is essential to prevent needle breakage and ensure accurate stitch placement. Some vintage Singer models allow you to adjust the feed dog height, offering greater control over fabric handling. Maintaining clean and properly aligned feed dogs and a throat plate guarantees consistent and professional-looking results.
Singer offers tools for every skill level, from beginner to professional.
X. Bobbin Systems: Types and Usage
Vintage Singer sewing machines utilize various bobbin systems, each with unique characteristics and threading procedures. Understanding your machine’s specific system is vital for correct operation. The two primary types are Class 15 and long bobbin systems.
Class 15 bobbins are commonly found in many Singer models and are relatively easy to use. They are inserted into a horizontal bobbin case, typically accessed through a sliding plate on the machine’s bed. Proper tension adjustment of the bobbin case is crucial for balanced stitches.
Long bobbin systems, prevalent in older machines, employ larger bobbins housed in a vertically oscillating bobbin carrier. These systems often require more intricate threading and tension adjustments. Husqvarna Viking Tribute 150C features an easy-to-use top-load bobbin.

Always use the correct bobbin type for your machine to avoid damage and ensure optimal performance. Refer to your machine’s manual for specific instructions on bobbin insertion, threading, and tension adjustment.
Singer offers tools for every skill level, from beginner to professional.
XI. Class 15 Bobbins – Common in Many Models
Class 15 bobbins are a widely used type in numerous vintage Singer sewing machine models, celebrated for their reliability and ease of use. These plastic bobbins are relatively short and flat, fitting into a horizontal bobbin case. Identifying your machine’s compatibility with Class 15 bobbins is the first step.
To insert a Class 15 bobbin, locate the bobbin case access door, usually a sliding plate on the machine’s bed. Gently pull the bobbin case out and insert the bobbin, ensuring it rotates freely. Thread the bobbin thread through the tension spring, following the designated path.
Proper bobbin tension is critical for achieving balanced stitches. Adjust the screw on the bobbin case to fine-tune the tension. Too loose, and the top thread will show on the underside; too tight, and the bobbin thread will pull excessively.
Using genuine Singer or high-quality compatible Class 15 bobbins is recommended to prevent issues like skipped stitches or thread breakage. Regular cleaning of the bobbin case is also essential for smooth operation.
Singer offers tools for every skill level, from beginner to professional.
XII. Long Bobbin Systems – Found in Older Machines
Older Singer sewing machines, particularly those manufactured before the mid-20th century, often utilize long bobbin systems. These systems employ larger, cylindrical metal bobbins, distinct from the more common Class 15 plastic bobbins. Identifying whether your machine requires a long bobbin is crucial for proper operation.
Inserting a long bobbin typically involves accessing the bobbin case from beneath the sewing machine bed. Remove the access plate and carefully insert the bobbin onto the bobbin winder spindle. Wind the bobbin evenly, ensuring the thread doesn’t overlap.
Long bobbin systems often feature a more complex tension mechanism than their modern counterparts. Adjusting the bobbin tension requires careful attention to detail, using the screw on the bobbin case. Incorrect tension can lead to uneven stitches or thread nests.
Genuine Singer long bobbins or high-quality replacements are recommended for optimal performance. Regularly clean the bobbin case and surrounding area to prevent lint buildup and ensure smooth thread flow. Maintaining these systems requires patience and attention to detail.
Singer offers tools for every skill level, from beginner to professional.
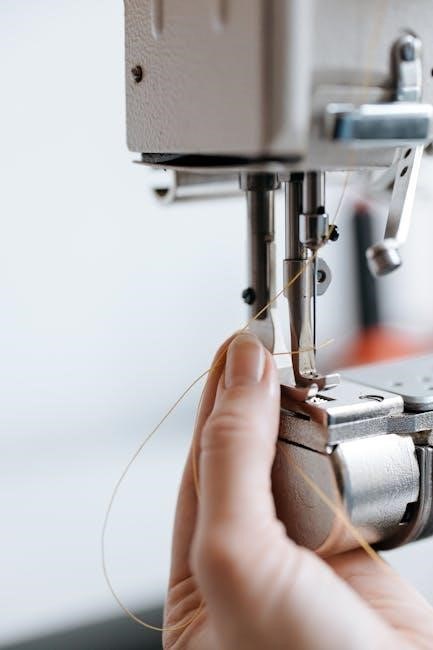
XIII. Threading a Vintage Singer
Correct threading is paramount for achieving quality stitches on your vintage Singer. While specific threading paths vary between models, the fundamental principles remain consistent. Begin by raising the presser foot; this opens the tension discs, allowing the thread to seat properly.
Start with the spool pin, ensuring the spool rotates freely. Guide the thread through the designated thread guides, often metal loops or discs positioned above and around the machine head. Pay close attention to the order specified in your machine’s manual.
Next, thread the tension assembly, carefully positioning the thread between the tension discs. This is a critical step, as incorrect threading here will affect stitch quality. Continue threading the take-up lever, ensuring the thread is securely engaged.
Finally, guide the thread through the needle bar and thread the needle from front to back. Use a needle threader if needed. Proper threading, combined with correct bobbin threading, is essential for smooth sewing.
Singer offers tools for every skill level, from beginner to professional.
XIV. Upper Threading – Step-by-Step Guide
Let’s detail the upper threading process for a typical vintage Singer; First, with the presser foot raised, place your spool of thread onto the spool pin. Ensure it unwinds smoothly. Next, draw the thread through the first thread guide – often a small metal loop near the spool pin.
Continue by leading the thread down and around the tension discs. This is crucial for proper stitch formation. Then, guide the thread up and through the next thread guide, typically located above the bobbin area.
Now, thread the take-up lever. This lever moves up and down with the machine, pulling the thread through the stitch. Ensure the thread is securely seated in the lever’s eye. After the take-up lever, thread through any remaining guides before reaching the needle bar.
Finally, thread the needle from front to back. A needle threader can be incredibly helpful here. Gently pull a length of thread through the needle eye. Proper upper threading is the foundation for successful sewing!
Singer offers tools for every skill level, from beginner to professional.
XV. Lower Threading (Bobbin) – A Detailed Walkthrough
Let’s focus on correctly threading the bobbin, a vital step for smooth sewing. First, ensure your machine utilizes the correct bobbin type – Class 15 or a long bobbin, depending on your model. Wind the bobbin evenly with thread using the bobbin winder, following your machine’s specific instructions;
Once wound, locate the bobbin case. For many Singers, this is accessed via a sliding plate on the machine’s bed. Carefully insert the bobbin into the bobbin case, ensuring the thread unwinds in the correct direction – typically clockwise or counter-clockwise, as indicated by arrows on the machine.
Guide the thread through the tension spring on the bobbin case. This ensures consistent thread delivery. Then, reinsert the bobbin case into the machine. Finally, draw up the bobbin thread by gently holding the upper thread and turning the handwheel towards you.
A loop of bobbin thread should appear. Pull both threads – upper and bobbin – towards the back of the machine. Correct lower threading is essential for balanced stitches!
Singer offers tools for every skill level, from beginner to professional.
XVI. Basic Sewing Techniques
Mastering fundamental sewing techniques unlocks your Singer’s full potential. Begin with selecting the appropriate needle and thread for your fabric. A universal needle works well for many fabrics, but specialized needles exist for knits, denim, and more.
Practice straight stitching first. Set your stitch length to a medium setting (around 2.5mm) and sew along a marked line, maintaining a consistent speed. Guide the fabric gently; avoid pulling or pushing it. For zigzag stitching, adjust both the width and length settings. Wider stitches are ideal for finishing raw edges, while shorter stitches create a denser, more secure seam.
Remember to backstitch at the beginning and end of each seam to secure the stitches. Utilize the presser foot to maintain even fabric feed. Experiment with different stitch combinations to achieve various effects.
Consistent practice is key! Don’t be afraid to experiment and learn from your mistakes. Your vintage Singer is a powerful tool capable of creating beautiful and durable projects.
Singer offers tools for every skill level, from beginner to professional.
XVII. Straight Stitching – Achieving Consistent Results
Achieving a flawless straight stitch is foundational to successful sewing with your vintage Singer. Begin by ensuring your machine is correctly threaded, both the upper thread and the bobbin. Select a universal needle appropriate for your fabric weight – a size 80/12 is a good starting point for medium-weight fabrics.
Set your stitch length to 2.5mm for general sewing. A longer stitch is suitable for basting, while a shorter stitch provides greater security for seams. Gently guide the fabric under the presser foot, allowing the feed dogs to do the work. Avoid pulling or pushing the fabric, as this can distort the stitch.
Maintain a consistent sewing speed. Slow and steady often yields the best results, especially when learning; Use the edge of the presser foot as a guide, keeping your seam allowance consistent. Backstitch at the beginning and end of each seam to secure the stitches and prevent unraveling.
Practice on scrap fabric before tackling your project. This allows you to adjust your technique and ensure a perfect straight stitch every time.
Singer offers tools for every skill level, from beginner to professional.
XVIII. Zigzag Stitching – Understanding Width and Length
Zigzag stitching offers versatility beyond straight seams, ideal for finishing raw edges, creating decorative effects, and sewing stretch fabrics. Your vintage Singer allows you to control both the width and length of the zigzag stitch, influencing its appearance and function.
Stitch length determines the density of stitches. A shorter length creates a tighter, more secure stitch, suitable for reinforcing seams or sewing delicate fabrics. A longer length is ideal for basting or creating a more open, decorative effect.
Stitch width controls the breadth of the zigzag. A narrower width resembles a straight stitch, while a wider width creates a more pronounced zigzag. Experiment with different widths to achieve desired decorative effects or to accommodate fabric stretch.
When sewing stretch fabrics, use a slightly wider and longer zigzag to allow for fabric movement without breaking the stitches; Always test your settings on scrap fabric before sewing your project. Adjust tension as needed for optimal stitch formation.
Singer offers tools for every skill level, from beginner to professional.
XIX. Troubleshooting Common Issues
Encountering problems with your vintage Singer is common, but often easily resolved. This section addresses frequent issues and provides solutions to get you back to sewing. A machine that won’t turn often indicates a power issue (for electric models) or a blockage in the handwheel mechanism. Ensure the power cord is securely connected and the machine is switched on.
Thread breakage is another frequent concern. This can stem from incorrect threading, a dull needle, or improper tension. Re-thread the machine carefully, replace the needle, and adjust the tension dial. Using the correct thread type for your fabric is also crucial.
Skipped stitches often point to a bent or damaged needle, or incorrect needle size for the fabric. Always use a new needle and ensure it’s appropriate for the material. Check the bobbin is correctly inserted and the thread path is clear.
Regular cleaning and oiling (detailed in later sections) prevent many issues. Remember, patience and methodical checking are key to successful troubleshooting!
Singer offers tools for every skill level, from beginner to professional.
XX. Machine Won’t Turn – Identifying the Cause
If your vintage Singer refuses to turn, don’t immediately assume a major malfunction. Several factors can cause this, and many are easily addressed. For electric models, the first step is verifying the power supply. Ensure the power cord is firmly plugged into both the machine and a working outlet. Test the outlet with another device to confirm it’s functioning correctly.
For hand-cranked machines, check for physical obstructions. Debris, lint, or hardened oil can jam the handwheel mechanism. Gently try to rotate the handwheel by hand; if it’s stuck, carefully remove any visible obstructions. A lack of lubrication can also cause stiffness.
Internal issues, such as a broken belt (in some models) or a seized motor (in electric machines), require more advanced troubleshooting. If you’re uncomfortable disassembling the machine, consult a qualified sewing machine technician.
Always disconnect the power before attempting any repairs or cleaning. A systematic approach – checking power, obstructions, and lubrication – will often pinpoint the cause;
Singer offers tools for every skill level, from beginner to professional.
XXI. Thread Breakage – Solutions and Prevention
Frequent thread breakage is a common frustration with vintage Singer machines, but often preventable. First, ensure you’re using the correct type and size of thread for your fabric and needle. A mismatch can cause excessive friction and breakage.
Check the threading path meticulously. Incorrect threading is a primary culprit. Verify the thread is properly seated in all guides, tension discs, and the take-up lever. Ensure no thread is snagged or twisted along the way.
Needle condition is crucial. A dull, bent, or incorrectly sized needle will damage thread. Replace the needle regularly and select one appropriate for your fabric weight. Also, confirm the needle is fully inserted and tightened.
Tension adjustments play a vital role. Improper tension – too tight or too loose – can lead to breakage. Experiment with slight adjustments until you achieve balanced stitch formation. Regularly cleaning and oiling your machine also minimizes friction and prevents thread issues.
Singer offers tools for every skill level, from beginner to professional.
XXII. Cleaning and Maintenance
Regular cleaning and maintenance are vital for preserving your vintage Singer sewing machine’s functionality and longevity. Dust, lint, and old oil accumulate, hindering performance and causing malfunctions. Begin by disconnecting the power source (if applicable) and removing the bobbin case.
Use a soft brush to remove lint from the bobbin area, feed dogs, and surrounding mechanisms. A small vacuum cleaner with a brush attachment can also be helpful. For stubborn grime, a slightly dampened cloth (water only!) can be used, ensuring no moisture enters sensitive areas.
Oiling is essential, but use recommended lubricants specifically designed for sewing machines. Apply a few drops to key moving parts – the motor, gears, and linkages – following the machine’s lubrication diagram (if available). Avoid over-oiling, as excess oil attracts dust.
Wipe down the exterior with a soft, dry cloth. Periodically inspect and tighten any loose screws. Proper care ensures smooth operation and prevents costly repairs, keeping your Singer sewing for years to come.
Singer offers tools for every skill level, from beginner to professional.
XXIII. Oiling Your Singer – Recommended Lubricants
Proper lubrication is paramount for a smoothly operating vintage Singer. Avoid using general-purpose oils like WD-40, as they can gum up the delicate mechanisms. Instead, opt for sewing machine oils specifically formulated for this purpose. These oils are designed to provide optimal lubrication without attracting dust or causing corrosion.
Recommended lubricants include Singer oil, Robison-Anton Thread Oil, or similar high-quality sewing machine oils. Apply oil sparingly to key areas: the motor (if applicable), gears, linkages, and the needle bar. Use a needle oiler for precise application, targeting moving parts.
Refer to your machine’s manual (if available) for specific lubrication points. If no manual exists, carefully observe the machine’s operation and oil areas where metal parts move against each other. Avoid over-oiling; a few drops are usually sufficient.
Regular oiling – every 6-12 months, or more frequently with heavy use – prevents wear and tear, ensuring your Singer continues to sew beautifully for generations. Consistent maintenance extends its lifespan and preserves its value.
Singer offers tools for every skill level, from beginner to professional.
XXIV. Finding Replacement Parts and Manuals
Locating replacement parts for vintage Singers can seem daunting, but numerous resources exist. Online marketplaces like eBay and Etsy are excellent sources for original and reproduction parts. Specialized sewing machine parts retailers also offer a wide selection, often categorized by model number.
Singer’s official website may have limited availability of parts for older models, but it’s worth checking. Online forums and communities dedicated to vintage sewing machines are invaluable for finding parts and advice from experienced enthusiasts. Websites offering downloadable manuals, like the one referencing the Singer 99K, can be incredibly helpful.
When searching, have your machine’s model and serial number handy. This ensures you order the correct parts. Be prepared to provide detailed descriptions or photos if necessary. Patience is key, as finding specific parts may take time.
Preserving your Singer often involves sourcing original components. Careful research and a bit of persistence will keep your machine running smoothly for years to come. Remember safety first when working with any machine!
Singer offers tools for every skill level, from beginner to professional.